Friday 18 September 2015

JAI 280 - Just add glimmer - Dove of peace pop-up slider Christmas card

It's new challenge time at Just Add Ink & this week the lovely Nikki has challenged us to Just Add Glimmer. No occasion says glimmer to me more than Christmas & glimmer also means a special card so this is what I made using some of my fave new Christmas goodies from the new Holiday Catalogue.
It's a pop-up slider card & my latest fancy fold obsession. My gorgeous friend Kellie showed me this one by Brianna Thompson with great tutorial & I was hooked. I converted Brianna's measurements to suit our Aussie A4 card, then used it with my class lovelies last month (a different design which I'll share with my template, next post). It looks tricky but it was really easy to do. The only cutting & scoring required is on the patterned paper piece.
Like most fancy folds, it starts off looking like a regular card...
...then pull up the ribbon, the dove pops up & reveals a secret panel & tag.
The pics don't show how glimmery the card is. The dove (& secret sentiment) is silver embossed, then coloured with a clear Wink of Stella glitter pen then attached with some silver thread swirls. It really shimmers in the light. The peace sentiment is red glimmer paper too. Maybe you can see the glimmer better in this pic (click to see a bigger pic).
Brianna's card didn't have an inside opening - I guess you'd write on the back panel - but I wanted to make a regular opening card so the recipient could leave it horizontal or hang it on a string (which is what I do at home). I think an unpopped version of the card would still look pretty. Anyhoo, here's what I did inside.
Well that's all for me for now. I hope you like my glimmery creation. Remember to check out all the team's creations here & join in with the challenge too

I'll share my other card & the template to make my A4 card version next time. Thanks for visiting today & come back soon. I'll leave you with a combined pic of the project to pin if you'd like. Leave a comment too if you've enjoyed my project or or if you have any questions about it.
Inky wishes, Di

Supplies To see & order any items used in today's project, just click on the items below to see them in my Online Store. You can order from me if you live anywhere in Australia. I would love to be your Demonstrator if you don't already have one. Please allow "Demonstrator contact" in your preferences so I can thank you properly when you place your order.
Note - Stamp sets & bundles noted below may be available in other mount options (eg wood, cling rubber or photopolymer). I have listed the option that I used. Please check the online store if your preference is different
.


Tuesday 8 September 2015

Peter Pan box frame card with a dash of pixie dust

You know I have a fascination with fancy folds & 3d projects so today I'm sharing my latest project - a box frame card with a shaker insert. I made this for a Peter Pan loving teen friend of Cara's rather than a card as I thought it would be something she'd like to keep - do teens keep cards?
Can you believe that the frame is made with just a piece of 12 x 12 double sided paper, scored, folded, cut & glued? Well, it is! Such a clever idea & totally not mine :-)

The box frame - these have been on my must-try list since I saw pics of  beautiful frames & templates shared by fellow Demonstrator, Pat Carr at an SU event in Perth last November. I played around with Pat's templates to figure out the size I wanted.Thanks so much, Pat for the inspiration. I'd love to include a link to Pat's creations but she doesn't blog.

The quote - is from Peter Pan by JM Barrie. I laid it out in msWord using text boxes & a typeface called Gist. This particular font is Gist Line Extrabold. I printed it on SU's card vellum (so the dots on the back of the floral paper would show through a little).

The shaker - the pixie dust quote needed some actual pixie dust, which meant including a shaker insert. Pixie dust is a little hard to find, but luckily SU has it's own in the form of dazzling diamonds glitter. I also added bermuda bay & silver sequins for extra colour & movement.
The shaker part is very easy to do -  I started with the printed sheet of vellum,  placed dimensional foam strips around edge for depth, poured in the pixie dust & sequins, then sealed with a piece of acetate. The shaker fitted under the frame, however if I make something like this again I'd make the shaker smaller than the space & simply attach it to the base if I made another one - much easier all round.

I added a folding stand to the back of the frame so it could stand on its own, which you can see in the pic below. I must also apologise for the greyish pics. It was impossible to take pics outside due to the reflections from the acetate & almost as bad inside. So, it doesn't look anywhere near as nice as in real life but hopefully you get the idea :-)
 
Here's a pic of the frame from the back, showing the stand.

I made a custom box-style envelope with my trust envelope punch board to hold the box. No pic, sorry.

I hope you my project gives you some new ideas to try. If you'd like more info about the frame, would like me to share my measurements or anything else, just leave me a comment. Thanks for visiting & pop back soon.
Inky wishes, Di

PS: Since I couldn't link to Pat's instructions I did some googling to try to find a tute that might help you make your own version in the meantime. I found this great photo tutorial by The Craft Spa for a long version & adaption to make a smaller square card version -  also by the Craft Spa to make a smaller square card version. While I didn't use these, they followed the same process I used so I'd definitely check them out.

Supplies
To see & order any items used in today's project, just click on the items below to see them in my Online Store. You can order from me if you live anywhere in Australia. I would love to be your Demonstrator if you don't already have one. Please allow "Demonstrator contact" in your preferences so I can thank you properly when you place your order.
Note - Stamp sets & bundles noted below may be available in other mount options (eg wood, cling rubber or photopolymer). I have listed the option that I used. Please check the online store if your preference is different.


I used a retired 12x12 piece of paper for this project. All other items below are available to order.

Sunday 6 September 2015

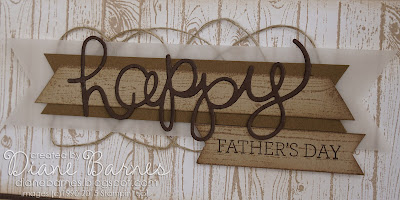
Hardwood for Dad - same but different

Does this card look familiar?
Hopefully it reminds you of this card I made for my FIL's birthday & Just Add Ink 274.
I thought it would be fun for my class lovelies to recreate a similar card at my masculine / Father's Day class last month, but make it quicker & easier to make & replicate in a more standard size.

What did I change?
1. Colours - tweaked the colour combination to be crumb cake, early espresso, soft suede & white.
2. Size -  the new card card front is smaller - 10 x 21cm (4 x 8-1/4 inch) front & fits a DL envelope. The change in size reduced the supplies needed & made it much more convenient to post.
3. Background - simplified by stamping Hardwood onto whisper white & adding simple sponging, rather than piecing & mitring the original background. I definitely think the gals appreciated this change :-)
4. Sentiment - I added a crumb cake Hardwood board behind the 'happy' to add to the timber feel, but otherwise kept it very similar to the original, which I loved.
5. Stamps - I used the sentiments from the Crazy About You bundle, same as the 'happy' die. It has lots of sentiment choices to suit lots of occasions.

Here's a closer look at the new sentiment & colours:
So many options...
We don't always have time to create brand new projects so adapting previous projects or elements of projects like this is a great way to create something new for other occasions or people.
For example, you could easily change the neutrals I used here & add a few little flowers to make a softer, girlier version of the card. Or you could use the layout &emboss the background with your fave folder or... So many possibilities. Maybe I'll have to try these & share what I come up with.

I hope you like my updated card & find new ways to adapt it to make it yours. Thanks for visiting & come back soon. Remember to pin my card to save it for later.

Supplies
To see & order any items used in today's project, just click on the items below to see them in my Online Store. You can order from me if you live anywhere in Australia. I would love to be your Demonstrator if you don't already have one. Please allow "Demonstrator contact" in your preferences so I can thank you properly when you place your order.
Note - Stamp sets & bundles noted below may be available in other mount options (eg wood, cling rubber or photopolymer). I have listed the option that I used. Please check the online store if your preference is different.